An easy way to build an autocomplete search for API endpoint docs
5 min
There are some APIs that we use often and having easy and fast access to them can save us from repetitive tasks. You know, as software engineers, we love to automate micro tasks to save that precious seconds of our lives :-).
The solution described in this post is simple, but uses a lot of tools and services. If you have patience, the final result is very useful. Here’s the list of things we use:
- APIfy to scrape the docs page (Scrapify is used by APIfy)
- XCPath Bookmarklet to don’t make us learn XPath again
- curl to retrieve the json version of the API docs
- jq to scrape this json and generate XML \o/
- grep to filter based on our search query
- Alfred workflows to implement autocomplete (Powerpack needed)
There are some very known tools in this list, and maybe some new to you. My recommendation is to keep attention and perceive the real value of APIfy and jq. These are really useful tools that can be used for a lot of other applications. Of course the other ones are interesting as well.
My wish was: be able to trigger a search in Alfred that shows me a list of Twitter REST API endpoints and when hitting enter, the browser would open the API endpoint doc.
The result was:
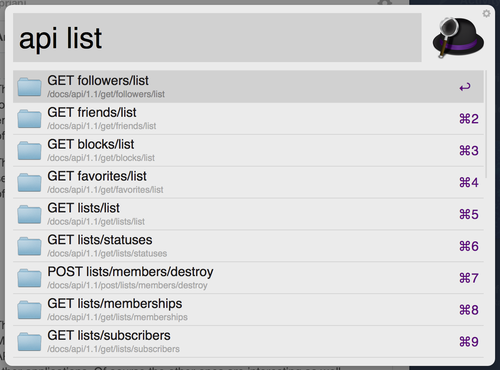
#productivity #win
Getting the data we need
APIfy is a really great tool to easily scrape an HTML page and exposes the relevant content as a json representation. The website has very descriptive tutorials that show how to create an API, I recommend them. But the process it’s uses is very simple:
For each field your API returns:
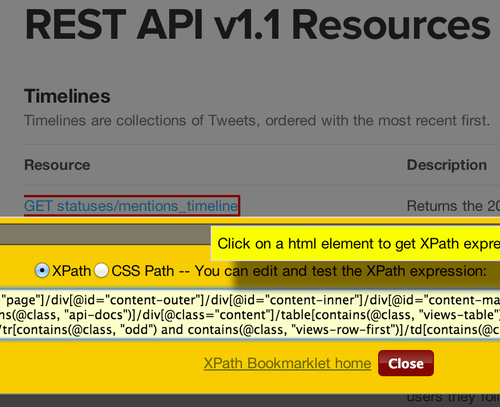
- Use XCPath Bookmarklet to get the XPATH or CSS of the element value you want;
- Do a mapping between the field name and value in APIfy editor;

You can check the brand new API created to expose all Twitter API endpoints as json at TwitterRESTAPIv1\ APIfy page. And of course, check the json representation returned by the API.
It’s very very useful. Make sure to check other APIs and how they are done, or try the Scrapify gem used to build APIfy.
Converting and filtering the data
Now that we have a json representation with each API endpoint, description and link to the docs, we can manipulate this json to be in the format needed to the next step in our flow.
jq, as website says, it is a lightweight and flexible command-line JSON processor. It’s a mandatory tool if you deal with a lot of json APIs, since it could transform raw API responses to beautified colorful representations and also allow you to filter, process, transform the data the way you want it. There’s a very good tutorial on the website.
In our case, we need to convert the json to XML… XML??? Why?!?
Well, this is the format chosen by Alfred to show autocomplete results. Basically, anytime a user trigger the workflow, a script is executed with the query and the response should be a XML with items that match the query and have other metadata such as what URL should be open if the user choose that item.
Let’s show the jq command we use:
And now let’s break it in pieces to understand what it does.
Surrounding the commands are two echo commands to add the root XML element needed to be input in Alfred. The second command is the request to the API we created that is pipelined to jq.
The jq command iterates over all entries in the response and do a string interpolation setting the resource of the endpoint and the link to it to some xml values and properties. It’s important to note that jq isn’t just to convert json to XML, it has a very powerful query language that enable you to do practically anything you want with your json. Check their tutorial.
The XML generated by jq is pipelined to a grep command, that filters for “search” using a regular expression. The final result is the following XML (already filtered by endpoints that matches the “search” keyword):
This is the input Alfred needs to show the items in autocomplete, as we saw in the beginning of this post. After testing the command in the terminal, then we need to use a Script Filter module of Alfred Workflows to run that code after triggering the keyword:
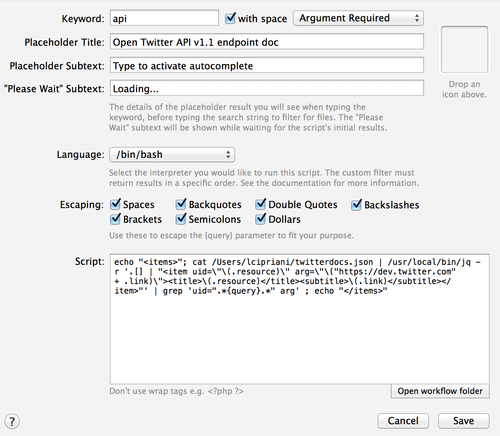
Note that instead of doing the request everytime, I just saved the json on my computer since I’m not expecting that the docs will be changed so frequently, and also because I don’t want to abuse the APIfy service.
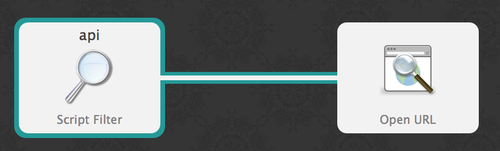
The final version of the workflow will look like this:
That’s it! Now we have everything working:
This combination of tools could help you to build any search to your most used APIs. And of course that there are some minor improvements to the command showed above, but the beauty of this is what we could accomplish with a short period of time thanks to these awesome tools.